Pages

Showing posts with label learning pottery. Show all posts

Tuesday, 14 April 2015

Should I make my own Pottery Glazes?

Coloured glazes used by Tinkling toadstools
This question has caused a lot of debate among potters. It is a similar question to "should I make my own bread, cakes or pastry?" Clearly there is no right and wrong answer. People who bake their own bread and cakes do so for numerous reasons. Whether it is to reduce costs or make it fresh or make it taste better; all are valid reasons. However most do it because they like it and the self satisfaction it gives them to create something of value.

 Similarly, the potter will often claim that making glazes gives him the same type of satisfaction, is cheaper and gives him more scope for creativity! But lets look at the issues involved in making glazes in detail to see if his claims are true:-

 Costs

Glaze materials
There is little debate that buying the glaze materials to make the glaze can reduce costs significantly. Common materials such as clays, felspars, silica, frits and pigments are all readily available from a number of suppliers. However, often they are not in the ideal form to produce a glaze without additional processing. Most need at least a number of processing steps to make a satisfactory glaze. These steps include, preparing a recipe, grinding or mixing with water, sieving, magneting, testing, and controlling the glaze slip consistency using additives. The time and knowledge to correctly process and test the glaze are mostly overlooked when cost comparisons are made. For those with time to learn about glaze materials and the process this is not an issue. However for many hobbyists who are time poor it clearly does not make sense economically.They are better using reliable commercial glazes.

Creativity

Unique copper ruby glaze
Without doubt making your own glazes is a creative exercise. Again using the same cake making analogy as before, you have complete control of the make up of the glaze and how it will look after firing. Just like cake recipes there are thousands of recipes for glazes each giving its unique colour, texture and appearance depending on how its fired. This uniqueness is what many studio potters strive for.  By varying the pigments and make up of the glaze in theory you can innovate to your hearts desire! Therefore creativity can surely be improved by making your own glazes!

Technical restrictions

In practice, however,  there is considerable science behind making acceptable glazes:
  • The glaze needs to technically match the body or the glaze may just peel off like old paint. 
  • There is a limit to the range of compositions that can be made- for example some recipes will just never make glossy glazes.
  • The firing cycle and atmosphere have as great an affect on the glaze appearance as the recipe.
The fired glaze surface of functional tableware needs to pass the requirements of legislation e.g. toxic metal release into foodstuffs.

So if you want to be creative with glazes you also need to have some technical knowledge. Potters without a scientific background may struggle to understand these technical parameters and hence making glazes could ultimately become more trouble than its worth.

Health and Safety

Unleaded Glaze
In recent years this issue has grown in importance for potters making their own glazes. Lead, for example, is being phased out in commercial glazes and its use and safety has been severely questioned especially in the USA. Other materials such as Barium compounds need to be used within strict guidelines for safe use. Even pigments such as cobalt and nickel oxide have been questioned over their safety. Clearly there is a lot to learn technically to comply with health and safety during the making of glazes. These issues are understood by commercial glaze manufacturers who can provide up to date data sheets on the glazes they manufacture and supply.

Equally important is an understanding of the legislation that applies to the fired product to meet the demands of the end market. Functional tableware has to meet much more legislation than ornamental ware in the various countries around the world.

Summary

In summary making your own glazes safely and successfully is much more difficult than at first appreciated. Technical and health and safety issues are not easy to overcome. However for a potter or hobbyist with a scientific understanding he can indeed be more creative and lower some material costs by making his own glazes. For the uninitiated it will be a long road of trial and error and frustrations. For those determined to try I recommend you do some reading and preparation online or in the wealth of books available before you begin. 

Good Luck and Happy Potting
The Potters Friend

More information and other technical articles on pottery and ceramics can be found at my website The Potters Friend.

Go now to sign up for my free newsletter.

Wednesday, 21 January 2015

Inspirational pottery glazes

The special ceramic materials and process

Reactive coloured glazes
The first article of my series on glaze making identified the basic ingredients used in glazes as silica, felspar, frit, and clay and explained how a little science would help speed up your artistic flair!.This second of the series on glaze making discusses the non core ingredients of a glaze and explains how a little science in the form of good processing can ensure that you achieve the best result from your glaze making efforts.

The 3 Basic Questions

To make truly inspirational glazes we need to establish at least 3 things
1) What type of glaze we want to make?
2) What type of body it will be applied to? Stoneware?, Earthenware? Biscuit? Clay?
3) What firing temperature/cycle do we intend to use?
Once we have the answers to these questions we can begin to formulate the glaze.

The choice of non core glaze materials

Making a silky matt -what to add to your basic glaze

Silky Matt glaze

Let us assume we want to make a white silky matt textured glaze firing at 1150C on stoneware biscuit.
We have already identified silica, felspar, clay and frit as core glaze materials. This means that at least 2 of these materials are used in almost all glazes.
Using the same cake making analogy as before, these ingredients are considered the eggs, butter, flour and sugar equivalents of the glaze recipe!
The materials we might consider adding to these core materials could be:-
Limestone (calcium carbonate)
Needle-like crystals on glaze surface
Dolomite (calcium magnesium carbonate)
Zinc oxide
Alumina (aluminium oxide)
wollastonite (calcium silicate)
clay (alumino silicate)

These materials help to form crystals on the surface of the glaze on firing and thereby help create the matt (dull) texture. However these materials also influence how the glaze melts and bonds to the body on firing. It is an absolute necessity to match the glaze to the clay body or on cooling the glaze may just flake way like old paint! (Technically the glaze and body thermal expansion need to match so that the glaze is in compression after firing.) But lets not go too deeply into how we do that at this stage.

Alumina does not readily melt at this temperature so the likely (and easier) materials to use are zinc oxide, limestone, dolomite and wollastonite. Adding these materials in the right proportions to make a suitable glaze takes a lot of trial and error.

Developing the Glaze Recipe

If you start a with a basic 1250 C recipe as follows:

Base Glaze

Silica 38
Felspar 40
Clay 10
Limestone 12

and start replacing the silica and felspar with more fluxing ingredients that create crystals and allow you to fire at a lower temperature you might eventually reach a formula

Modified Glaze

Limestone 12
Dolomite 25
Felspar 20
Clay 25
Zinc oxide 4
Boron frit 9
Silica 5


Imagine how many test glazes you might need to make before arriving at such a detailed recipe? Note how different this is from the starting base transparent glaze! The material recipe is not the only part to consider when making glaze. The particle size of the glaze materials needs to be reduced to a fine powder by grinding with ceramic pebbles in water to less than 75 microns. Often, for best results, the mean particle size needs to be closer to 15 microns-the diameter of the finest human hair. This allows the glaze particles to react and melt during the firing process.

Firing the Glaze

The firing process is equally important in obtaining satisfactory and repeatable glaze results. Initially the firing cycle should remain constant as you develop your glaze recipe. A typical glaze cycle might be 150 C per hour ramp from room temperature to the peak at 1150 C, followed by a holding period (soak) at peak temperature of 1 hour, followed by kiln switch off and natural cool to room temperature.
Note that the cooling is often as important as the heating process when firing matt or crystal type glazes.
Clearly making glazes is quite a complex process. However, like the best potters, in time you will come to believe that this is what makes pottery glazing so interesting. You can never be sure what will come out of the kiln each day!
In the next of the series the use of ceramic colouring pigments to create even more interesting coloured pieces will be examined..

Pottery books of value

A great way of backing up your knowledge is to read some simple pottery making books. Some of the best books are those you keep going back to as your knowledge grows!

Thought for the Day

In pottery making it rarely goes exactly as you would like first time. Stay positive! Use it as a learning experience.
Henry Ford Quote:
"Failure is only the opportunity to begin again, only this time more wisely."
~ Henry Ford

Happy Potting
The potters Friend

More information and other technical articles on pottery and ceramics can be found at my website The Potters FriendGo now to sign up for my free newsletter.

Sunday, 21 December 2014

Why do I need frit in my glaze?

A glaze after firing can be considered to be a glass. Therefore it is not surprising that traditional glass making materials such as quartz, limestone, and felspar are commonly used to make glazes. However glazes which are intended for firing below 1150C need other elements such as lead or boron and alkalis to create the right properties. To enable these elements to be included safely they are often pre-melted with other glass making materials to form a FRIT.

What is a frit?


Borosilicate frit
Lead frit
China clay


A frit is a a pre-melted glass which is granular in nature. Once crushed and ground to a fine powder it provides the basis for all low firing glazes. Often a glaze contains merely one frit and clay. The clay is added as a suspending and binding agent to aid glaze storage, application and firing.

How many frits are there?

There are literally thousands of frits. The compositions have been researched and developed over a long time period to provide the right technical properties such as fusibility, thermal expansion and durability. A wide range of properties are needed to meet the wide range of bodies and firing cycles used by manufacturers and craft potters.In general terms frits are normally classified as transparent or opaque and then lead containing or lead free.For environmental/safety reasons lead containing frits are gradually being phased out and replaced with lead free alkali borosilicates.

Can I make my own frits?

It is possible but not recommended. Large scale frit manufacturers often make frit by a continuous method in a high temperature box type kiln using specialist refractory linings. These kilns produce tonnes of frit per day, meaning they can achieve consistent high quality output. For other than the most demanding glaze requirement, making your own frits is unlikely to be cost effective.

How many types of frit do I need?

This depends on the number of clay bodies and firing cycles you employ. As a basic requirement you need a transparent frit, an opaque frit and an expansion modifier frit. These should allow you to make transparent, opaque and semi opaque glazes suitable for conversion to coloured glazes by adding colouring pigments.

Why not use frits in all glazes?

In theory this is possible but the costs would be excessive. For example high temperature stoneware and porcelain glazes can be manufactured with lower cost glass making materials such as felspars, quartz, limestone and clays.

Where can I buy frits

Most pottery material distributors sell small quantities of powdered frit suitable for the studio or craft potter. Industrial scale potters may buy the frit direct from manufacturers such as Endeka, Ferro or Esmalglas.

Happy Potting
The Potters Friend

More information and other technical articles on pottery and ceramics can be found at my website The Potters Friend.      Go now to sign up for my free newsletter.

Wednesday, 23 April 2014

How to Make Coloured Pottery

The Appeal of Colour

Copper Ruby glaze
The addition of colour to pottery adds so much to its appeal. Whilst white pottery can emphasise the distinctive form of a piece it is often colour which catches the eye! Colour is often associated with a mood or feeling and this varies between cultures and countries. For example red is a very emotive colour and can mean anything from love and romance to danger and fire! Choosing the right colour to make or decorate your pottery however is a matter of personal choice and allows for much creativity and freedom of expression.

Colour can be added to pottery in many ways including body colour, underglaze, inglaze, onglaze and also as a component of the glaze itself.


In this article I will try to review the two main types of ceramic pigment ( raw oxide and ceramic stains) available and how they can be used to produce highly decorative pottery.

In the second of my series on glaze I described how to make a white textured stoneware glaze. 
Simply adding inorganic colouring oxides such as Iron Oxide to such a glaze produces colour but not always the desired colour!  Carry on reading to find out why!

Raw Oxides in Coloured Glaze


Top = Oxides in transparent glaze
Bottom = Oxides in opaque glaze
Copper oxide crackle glaze
It is common for raw oxide pigments to be used used in pottery making. Many studio and craft potters prefer to use cobalt oxide, chrome oxide, Iron oxide and copper oxide as colouring pigments.These oxides give blue, green, yellow-brown, and green-blue respectively on firing in or under the glaze. Often the fired colour of the starting oxide is not the same as the original oxide colour e.g. cobalt oxide changes from black to blue on firing in a glaze. However mixing of these oxides in a glaze, gives variable but often aesthetically pleasing artistic effects on firing. It is for this reason, and the lower cost involved that many studio potters often use these materials.

Iron Oxide and cobalt oxide in glazes
In using oxides as pigments It is important to match the pigment type and content to the glaze to achieve the most consistent results. In the example above iron oxide gives a yellow colour when added to a glaze in small percentage (eg 1%) compared to a brown colour in high percentage (eg 15%). In combination iron oxide and cobalt oxide often give grey or a black glaze colour (see example right). The difference in the colour between an opaque and transparent glaze containing the same pigment content is also marked. In the example above the same pigment content is compared in a transparent glaze (top) and an opaque glaze (bottom). A stoneware textured glaze will produce colour tones similar to those of an opaque glaze.


Organic pigments such as those used in paper printing are clearly not suitable and will simply burn away during firing

Ceramic Stains in Coloured Glazes


Top = Ceramic stains in transparent glaze
Bottom = Ceramic stains in opaque glaze

In contrast to raw oxide pigments, ceramic stains have been specially formulated to create a wide range of colour tones in glaze. In their manufacture they have undergone a heat process and a fine grinding process so that they are highly temperature stable and capable of being mixed together to generate intermediate colour tones. This property is highly valued by large scale manufacturers who need consistency of colour tones. However this all comes at a cost compared to raw oxides.

Onglaze and Inglaze Decoration


Pantone Mugs showing onglaze colours
It is common for high quality whitewares such as bone china and porcelain to be decorated with special colours called onglaze (low temperature) or inglaze (high temperature). These colours use a mix of special fluxes and the ceramic stains identified above to create a wide range of intense, durable colours and bond them to the already fired glaze surface.. Whilst a few studio potters try to make their own, they are best supplied by specialist manufacturers to ensure they meet current legislation and perform satisfactorily in use. These colours are often supplied as powders or pre-dispersed in a liquid allowing them to be applied by hand painting or screen printing. This type of colour is very versatile and is often used to make precision decorative decals for water slide application onto pre-glazed pottery. A new development called Digital printing now allows these decals to be personalised and produced in small quantities making it a cost effective method of decoration for craft and hobby use.

Summary

Clearly there is more to making coloured pottery than is immediately obvious. For those who want consistent colour that can be mixed to give intermediate shades then use ceramic stains either as a glaze component or in decoration products such as inglaze or onglaze colours. For those who want unpredictable but aesthetically pleasing results use oxides as a glaze component or under the glaze. Whichever option you choose using colour creatively will only add to the appeal of your pottery.

Happy Potting
The Potters Friend

More information and other technical articles on pottery and ceramics can be found at my website The Potters Friend.

Go now to sign up for my free newsletter.


Thursday, 13 March 2014

How to Choose Your Pottery Clay Body

What is clay?

Flat plates of clay particles
Before choosing your pottery clay body it is first important to understand a little about clay and why it is used as a component of a clay body. Clay is a mineral extracted from the ground which can be readily moulded like plasticine. At microscopic level, the particles of clay have a flat plate-like structure giving them this plastic like property. The 2 most commonly used pottery clays are Ball Clay and China Clay (Kaolin). Ball clay tends to be very plastic-mouldable but off white in colour. China clay is less plastic but has a whiter fired colour. Many other clays are available but they tend to be off white to red in colour and therefore less used in high volume white pottery manufacture.

What is a clay body?

The terms clay and body are used by potters almost interchangeably. However in most cases it is not technically correct! In simple terms a body is a formula containing clay and other minerals. Therefore clay is a raw material component of a body. In past times a body was simply a clay dug from the ground which was variable in both its composition and properties. However, modern commercial potters no longer rely on bodies manufactured from clay alone. To achieve specific properties they are scientifically formulated in a very precise way. A wide range of raw clays and minerals are used from all around the world. They vary in colour, strength, particle size as well as mineralogy and purity. No two clays from different parts of the world are precisely the same although for comparison purposes they can act in a similar way when used as part of a body formula. For studio pottery manufacture coarse minerals called grogs are often added to the clay body formulas to give additional texture appeal and improved properties.

How to choose the best clay for you


Firing range of your kiln


The maximum firing temperature of your kiln should be your first consideration when deciding which type of clay body to buy. It is no use choosing a stoneware clay firing 1250 C if your kiln will only fire to 1200 C. Lower temperature kilns are suitable for earthenware and terracotta bodies (less than 1200 C) whereas high temperature kilns are acceptable for most bodies including porcelain and stoneware.

Colour


The fired colour of the body will often dictate the cost. In general whiter clay bodies are more expensive than buff or cream coloured ones. The type of clay body you use is often prescribed by your colour selection. For example porcelain and bone china are always very white after firing.  To give you an idea of the fired colour produced by the different clay body types see the section entitled 'range of bodies'. Please also note that the firing temperature has a significant affect on the fired colour!

The making Process


The making process you intend to use to shape the body is also an important factor when considering the most appropriate clay body. Clay body sub-types allow you to select a clay suitable for all major forming operations including throwing, hand-building, sculpting, casting or machine making.

Size of your work and end use


The size of the pottery piece you plan to make is also important. Larger pieces often require a more heavily grogged (less plastic) clay whereas smaller pieces of work can require more plasticity. In addition, the end use of the ware, whether it is purely ornamental, for outside use, or designed as functional tableware will affect your choice of clay body.

Texture


For the more experienced potter the texture of the clay body after firing is often important.. The feel, look and strength of the ceramic piece is strongly affected by this sub-type of clay. For example the grogged subgroup of bodies generally add texture, strength and stability, whilst an ungrogged body will result in a smoother more polished finish.

Glaze compatibility


Whichever clay body you choose it is imperative that you select a glaze which is compatible with the body. This technical compatibility is critical to producing an intact piece without faults after firing. Be guided by your supplier who can supply compatible glazes for most body types and firing schedules. For peace of mind you should always test a sample of the glaze and clay body in your own kiln prior to any major production. The temperature and firing schedule of your kiln will influence whether your clay body and glaze are compatible after firing.

Range of Clay Bodies


The are numerous clay bodies produced commercially around the world available to the craft potter, studio potter and commercial pottery. Indeed there are so many that it is impossible to detail them all here. Bodies are often developed to make them suitable for the making process. Therefore suppliers often state  subtypes which define which clay bodies are more suitable for hand throwing, casting, hand building etc.

Clay bodies however can be classified into a relatively small number of categories according to their colour, firing range and texture. Below are a few major examples showing the fired colour of individual body types.

Porcelain
Bone China
Earthenware
Stoneware
Terracotta


Bone China


Bone China chocolate cup
Bone China
This is a smooth textured extremely white firing body that is also translucent. It is unique in that it contains a high proportion of calcined bone ash . Biscuit firing at approx 1220 C gives it a high strength making it suitable for producing delicate highly decorative items as well as tableware. This type of ware after glazing is often decorated with onglaze colours or precious metal decoration to create stunning pieces of pottery. Electric firing kilns usually produce the best bone china quality.

Porcelain


This is a smooth textured translucent extra white firing body similar to bone china. However two types of porcelain are made, a 'hard porcelain' which requires a glaze firing in excess of 1400 C and a 'soft porcelain' which requires a glaze firing to approx 1250 C. Biscuit firing however is often around 1000 C which allows pieces to be glazed more successfully. High temperature gas kilns are often used to fire this type of body. Porcelain, like bone china, can also be decorated with onglaze enamels and precious metal to create delicate highly attractive giftware as well as tableware.

Stoneware


Stoneware jar
Stoneware
This class of clay body is commonly used by craft and studio potters. It has a relatively high biscuit firing temperature in excess of 1150C.  Many commercial bodies, available in a range of off white to buff colours, are fired in the range 1250-1300C to give maximum strength. By glazing with a reactive type coloured glaze a wide variety of effects and colours can be achieved. Because of this stoneware has found high popularity with craft potters looking to create unique coloured or or textured hand made pottery. This body type can be used to produce both decorative and functional pieces such as tableware.

Terracotta


Terracotta
This class of body is typified by its unique red terracotta colour. This clay body has a high iron content in its mineral components giving the unique red colour. Like stoneware the smooth texture can be modified, by addition of grog (coarse material), to give a much rougher finish. Terracotta bodies have a relatively low firing temperature of 1000-1050C and are therefore porous and have relatively low strength after firing. Commonly unglazed it is often used for sculptures, planters, tiles and garden ware where the technical properties are not so demanding. For more demanding environments such as tableware the body is often glazed to give a stronger more durable product.

Earthenware


This type of body is often used for hand painting by hobbyists.
Burleigh Blue and white jug
For craft pottery this body is biscuit fired to approx 1000 C to allow easy brushing of underglaze colours or coloured glaze on to the porous surface. Following  glaze firing to 1050 C to 1150 C the body colour and underglaze colours show through the transparent glaze producing highly decorative ware.  After glaze firing the body remains porous with reduced strength compared to fully vitrified bodies like porcelain or bone china.

Body colour ranges from white to buff and some bodies are also grogged to provide texture.

For commercial tableware optimum body strength is achieved by firing the biscuit in the range 1180-1220 C but this peak is not often needed for lower strength or decorative only ware.

Special bodies
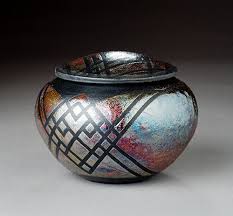
raku firing by Lori Duncan
This range of bodies include, highly coloured bodies, low firing bodies, Raku bodies, and special highly textured bodies. In the case of Raku the body is modified to allow rapid heating and cooling without  cracking, usually by the addition of grog. Making raku pottery successfully requires more expertise than other pottery types and often depends on a trial and error approach. To learn more about Raku read my separate article on Raku making.

Summary

Clearly, choosing the right clay body for you poses a number of technical questions. It is more difficult than is immediately obvious. However I recommend you talk to your clay body suppliers in the first instance and not just search the internet. Their vast knowledge of their products will make the whole process of selection of suitable body and glaze just that much easier.

Good Luck
Happy potting!
The Potters Friend


More information and other technical articles on pottery and ceramics can be found at my website The Potters Friend.

Go now to sign up for my free newsletter.

Tuesday, 7 January 2014

How to choose your pottery kiln

K&F front loader
Making a kiln purchase is a big step for many potters. It is probably the biggest financial outlay you have as a potter and you would expect a new kiln to last 10 years or more depending on frequency of use. Most pottery beginners start by attending pottery classes and having their ware fired by the tutor. After developing your skills and with a long term commitment to pottery making you are in a better position to decide your needs:-

Set your Budget

Decide your budget. Make it realistic and include cost of delivery and installation. Also don't forget internal shelves and supports are not usually supplied as part of the kiln and need to be purchased separately. Include a good temperature controller. A kiln is only as good as the controller! Remember planning permission maybe required for some external installations? Decide whether you want to buy new or second hand. Although this will vary considerably as a rule of thumb a good quality second hand kiln  is often about 20% cost of new.


Select the energy source

Decide what type of kiln energy source you will use. Often the type of ware and pottery you intend to make can determine this. For example reduction firing of glaze will require gas or oil firing whilst decal firing is better done in electric firing. It is worth noting that, in general, electric is a cleaner and more controllable fuel than gas but more expensive. Other fuel sources such as Oil, LPG, and wood vary tremendously depending on location and availability.

Identify kiln size and site and type

Decide what size and where it is to be located, does it need special ventilation? How many pieces do I want to fire now? and the future? What size or weight will they be? Will I fire bisque and glost and decoration?

Whether to choose a front loading or top loading kiln often depends on the size and number of the pieces you wish to fire. Generally top loading kilns are smaller than front loading kilns which are easier on the back for placing and unloading.

Visit showrooms or research online

There is no substitute for seeing the kiln you want to buy in person. This will give you a real sense of size and ease of use. A good supplier of kilns will have a range of kilns for display purposes and talk you through many of the decisions you need to make. However as a general rule you need to know the following before you talk with your supplier

What size and shape of pieces you wish to make and how many?

What temperature you wish to fire glost or bisque or decal

Whether you have refractory shelving and supports for the pieces you want to make.

Whether you have 2 or 3 phase electric supply. Domestic supplies are predominantly 2 phase.

Whether you have mains gas supply or other


Calculate firing costs

It is possible to work out the firing costs using the KWH rating or gas usage as a guide. For smaller hobby kilns the difference in costs between gas and electric may not be high but for bigger kilns this needs to be factored in to your buying decision. Again a good kiln supplier will be able to advise you on this.

Choose both for now and the future

Make your selection based on your plans for the foreseeable future. Agree the price for everything including the set up of kiln in its final location not just to your doorstep. Unless it is a simple domestic plug in kiln, employ a professional electrician or gas fitter to ensure your kiln is installed correctly. This gives you peace of mind as well as meeting any legal requirements.

Test out the kiln 

Once you have your new kiln installed test it out first with known tried and tested body and glaze. New kilns can take a while (a few firings) to settle as the refractories are more porous than a used kiln and the gasses from firing soak into the brickwork.

Happy Potting!

Enjoy the new sense of freedom having your own kiln brings and good luck!


More information and other technical articles on kilns, pottery and ceramics can be found at my website The Potters Friend.

Go now to sign up for my free newsletter.

Wednesday, 2 October 2013

Starting out in Pottery? Read this first!

Making pottery is just like baking  a cake but more complex!


I can tell you one thing about pottery that is in-disputable. It is diverse and more complex than you could ever imagine. Think of it as being like baking a cake. There are literally thousands of different recipes and baking instructions, including the one your grannie used to make! Many of the cake recipes make great cakes but they are all slightly different.

 Clay bodies and glazes are just the same but even more complicated! This is what many potters find fascinating. They can develop their own clay body, glaze and process in a way that makes them special and their pottery products unique. Please remember that!

 However for the novice all this complexity creates confusion. Listening to more experienced potters providing a snippet of knowledge is not always good for you. Beginners try to relate it to their needs and often it results in failure.

 So here is what the beginner really needs to know and not forget.

Start with a pottery class


Start with a pottery class. Here you can learn the basics with the support of a tutor. You can meet new friends and even take comfort in that you are not alone in your struggles to learn a new skill! A good tutor will not only guide you but provide material recommendations to allow you to reach the next stage of working alone.

Choose a Quality Clay and Glaze supplier


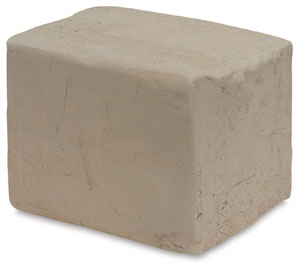
Clay Body
If you must go it alone there are many suppliers out there who can help you make the right choice of initial materials. They have the experience and knowledge of a wide range of clay bodies and glazes.
Tell them what you want to make and how. For example. "I want to make pottery by using a potters wheel. I want to glaze it with a white glaze by dipping and I have a pottery kiln that has a maximum temperature of 1250C. "

They can then provide a clay and glaze that are compatible which when processed correctly will give you the best possibility of success.


Process the clay and glaze as recommended by the supplier 


Orton Cones
The making and firing process used to make the pottery is as important as the clay and glaze materials. Therefore process the clay and apply the glaze as recommended by the supplier. Fire the clay and glaze in the kiln as recommended by the supplier.  Firing is often controlled by a firing cycle input into an electronic controller and/or Orton cone values. For more information on firing read my detailed article how to properly fire your pottery.

Once you are happy with the finished result repeat it several times. This proves the process you have  used will work consistently as well as giving you confidence in your skills.

Make a note of the clay body, the glaze, the firing schedules and take a photo of the fired appearance. In this way you will always have a record of how to reproduce your great work of art!

Only once skilled add your own artistic flair


Making pottery is a combination of art and science. The art to design something unique and the science to make it into a product. Only when you have the basic pottery skills and can repeatedly create the same basic product should you become focused on artistic flair.

Developing  your own style and delight in making something unique


Lori Duncan Raku
Potters are often most satisfied when they have developed their unique style or products. Using baking as analogy, top bakers often specialise in making bread, cakes or pastries and have their one stand out dish. Likewise potters specialise in stoneware, raku or wood firing or other depending on their influences.

However they develop this over many years of making and studying pottery. 

So do not rush to specialise too early. What all master potters have in common is a strong basic knowledge of clay, glaze and firing.

Keep on learning and enjoy


Pottery making is meant to be enjoyable so make sure this happens. One way to do this is to continue to learn new things. In pottery making this is relatively easy as the subject is so diverse and changing that you never become a master of all.

Once adept at basic skills look at all elements of what you do not just the making technique. Using materials such as colour creatively can open a whole new spectrum of ware. For example if you only made plain glossy white, look at making some coloured glazed pieces.

One way to do this successfully is to enrol on a pottery course specialising on one type of technique. For example studio potters often run courses to help others develop their knowledge of raku or wood firing or sculpting etc. For more information see my list of pottery courses/classes available in the UK

Above all enjoy!

Good Luck
Happy Potting
The Potters Friend


Monday, 29 April 2013

How to Choose a Pottery Wheel

Buying a pottery wheel can be quite an expensive issue.
Whilst second hand wheels exist it is difficult to judge their state of repair and future reliability. Therefore make sure you make an informed choice.

So what factors should you consider when buying your pottery wheel?

Weight of clay


When choosing a pottery wheel the weight of clay you intend to throw decides the power of the motor you will need for a power driven wheel.

Typical weights are as follows:
  • ¼ HP for small pottery items 20lbs (10kgs approx) max for beginners
  • ½ HP for medium sized items up to 100lbs (25 kgs approx) max suitable for most commercial potters
  • 1 HP for large items 200lbs (50kgs approx) for experienced potters making very large items.

Quality and ease of operation


Quality of wheel can be an issue as it comes at a price. However you should also consider at least:

  • Noise-older type wheels can be quite noisy whilst some recent models are whisper quiet

  • Smoothness of pedal operation

  • Smoothness of wheel particularly at low speeds- a jerky transition of speed can cause difficulties -important for delicate shaping

  • Reversability-can it be used by left and right handed people?

  • Electric or kick-wheel operation? Foot pedal or hand lever operation? Whilst kick wheel models may be cheaper they can take some getting use to if you are already used to an electric powered
  • Wheel head size and predrilled holes- The wheel head size dictates the max diameter of clay piece which can be thrown. Holes in the wheelhead allow a bat (special disc) to be used. Pins allow release of the bat, holding the thrown piece, from the wheelhead. The thrown piece can then be removed easily for drying while a new piece is thrown.

Mobility


Some wheels are very light in weight and designed to be portable whilst others are meant to be static. Consider if you want to move the wheel between different locations. Heavy powerful wheels can be more durable and long lasting.
Examples of different wheel types are:

A Tabletop Wheel

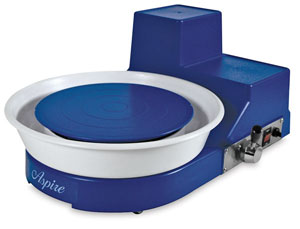
Shimpo Aspire Pottery Wheel
The Shimpo Aspire can handle your most creative challenges. Its lightweight, compact design makes it easy to transport, and a 20 lb centering capacity makes it a practical addition to any studio or classroom. The Aspire features a 1/3 HP, 100W DC motor, a 7" alloy wheel head, and a removable one-piece splash pan. The wheels speed ranges from 0–230 rpm, controlled by a hand lever. Also included are two 9¾" bats. It measures 9" H × 14½" W × 20" L and weighs 25 lb . Amazing, affordable, accommodating … Aspire! Shimpo’s Aspire Pottery Wheel includes a two-year limited manufacturer’s warranty.  


A Powerful model suitable for seated use

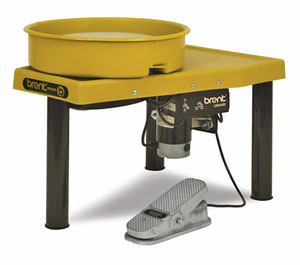
    Brent Model B
Brent wheel Model B is designed to fill the needs of schools and studio potters. Competitively priced, this wheel is quiet and solid under 150 lb (68 kg) loads of clay. A 1/2 HP motor provides the power and weight necessary for school use. A splash pan and 12" Plasti-Bat are included. Shipping weight is 112 lb (51 kg). Truck shipment is required. 10-year limited warranty. CE-certified.


Super quiet model for seated use-The Shimpo's Whisper

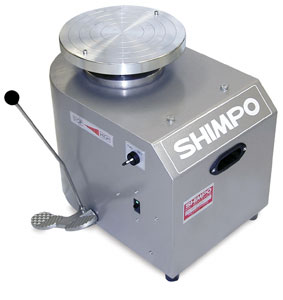
    Shimpo RK-Whisper Potter's Wheel
Potter's Wheel is extremely responsive, with high torque at all speeds. It's powerful, and by far the quietest pottery wheel on the market. The ½ HP, brushless DC motor has a direct drive (no belt) system and a broad speed range for optimum control. A fixed foot pedal with hand lever operates the electronically controlled motor. The motor is reversible for lefthanded and righthanded users. The 12" wheelhead and two-piece splash pan are standard. Centers up to 100 lbs. The wheelhead also turns freely, so it can be used as a banding wheel at 0 rpm.

Warranty and Cost

Warranty and cost often go hand in hand. A warranty can be anything between 1 and 10 years and cost will be upward of $350 dollars for a new wheel. It is worth asking if it can be repaired locally within the warranty if anything goes wrong..

Saturday, 1 December 2012

Shiny Pottery Without The Glaze!


Roman red gloss terra sigillata bowl with relief decoration
Photo from Museum Römerhalle Bad Kreuznach

Terra Sigillata

After reading about burnishing recently I researched the technique even more and came across Terra Sigillata which literally means 'clay with little pictures'. This definition makes sense if you look at many of the early pots made using this technique which feature figures in relief. However later pots similarly described do not contain figures. So Terra Sigillata has come to be known as pottery manufactured with surface slips which when fired produce a glossy surface ranging from a soft lustre to a brilliant glaze-like shine. Samian ware is also sometimes used to describe all varieties of terra sigillata including undecorated ware.

The history

Ancient Greek pottery neck amphora showing a swordsman.
Image Courtesy of Marie-Lan Nguyen
Most well known for its use in ancient Greek ware Terra Sigillata now describes specific types of plain and decorated tableware made in Italy and in Gaul (France and the Rhineland) during the Roman Empire. These vessels have a range of glossy surfaces and are often found in their characteristic colour range of pale orange to bright red.They were produced in standard shapes and sizes and were manufactured on an industrial scale and widely exported.
The sigillata industries grew up in areas where there were existing traditions of pottery manufacture, and where the clay deposits proved suitable. The products of the Italian workshops are also known as Arretine ware, and have been collected and admired since the Renaissance.


What is a Sigillata slip made of?

Refined Kaolin particles
Terra Sigillata, is made up of finely separated clay particles in water. The clay particles are mostly composed of kaolinite crystals which have a flat plate-like structure.  These particles therefore have a high width to height ratio, called the aspect ratio making it easy for them to fit together in a stack just like a pack of cards.The platelet however are tiny and at less than 2 microns wide can only be viewed using at high magnification microscope. To put this in perspective a human hair measures approx 70 microns in diameter-35 times the size!.

How Does it Work?

When the slip is applied to the surface of a clay article as several very thin layers, the flat plate-like particles align naturally to give a smooth reflective finish. The application process is critical as applying one thick layer is likely to cause the layer to crack as it dries and shrinks. The slip can be successfully applied to leatherhard or fully dry clay. However the best results are reported as being by applying to it to dry ware that has had the surface roughened using 120 grit sandpaper.

For a shinier appearance a quick polish of the surface with a piece of chamois or plastic film or even with a finger tip is effective. This increases the fraction of platelets laying flat on the surface thereby creating increased reflected light.

How does this differ from burnishing?

Polishing and burnishing can give a highly reflectively surface finish but it is a highly labour intensive process. It requires the potter to compress the clay with a polished rock or the back of a spoon in small circles for hours on end until the whole surface has been compressed. This process causes  the clay platelets on the surface to lie flat, while all the other coarse particles are pressed down into the surface. However it creates a very smooth, highly reflective surface.

In contrast, Terra Sigillata avoids the laborious polishing process by naturally laying down a thin layer of aligned clay platelets. Minimal polishing is required to achieve the same high shine as hours of burnishing.

Making the slip

You can make terra sigillata slip from almost any raw clay or clay body that contains kaolinite. However, only a portion of the starting material will contain sufficient fine clay particles to make a good Terra Sigillata. It is therefore important to use a separation process to split the 'good' clay from the 'bad'. This involves first mixing the clay then allowing it to sediment before decanting off the good material.The yield and performance of the slip will be influenced by the particle size of the clay. Therefore in general finer starting clays produce better slips and yield.

Details

The first step is to make a highly fluid de-flocculated suspension of the clay of SG 1.15. A mix of sodium silica/soda ash deflocculant and water is used. After sedimenting for approx 20 hours the ultra fines are decanted off to be used to produce the slip. The suspension at this stage is very watery and needs to be concentrated by evaporation or gentle heating of slip. Approximately 10% of the initial starting material suspension will remain to be used as slip.The slip needs to be approx SG 1.15 for best application.

Applying the slip

Application is made to the dry clay body by using a wide, thick soft brush heavily loaded with slip. Long flowing strokes should be used and drips should be avoided. if a drip appears remove it immediately with your brush. Work around the piece, building up thin coats until I the surface begins to conceal the sanded texture. If available a potters wheel can be used to give an even application. Overall, it needs a very fine coat of slip to avoid cracking and peeling of the layer.The success of this process is a matter of experience-as different slips require layer thickness for optimum effect.

Polishing of the applied Slip Surface

As soon as the the slip layer looks touch dry the surface is polished with a piece of grocery bag plastic or soft material. Amazingly the surface should develop a bright shine in just one polish.

Firing of the slip applied ware

Like burnishing, the terra sigillata surface needs to be low fired for best results but this depends on the clay slip and the underlying body used. Whilst a true burnished surface is recommended for firing at less than  cone 012 (875C), a terra sigillata-coated surface lightly polished can sometimes be fired as high as cone 02 (1125C).

Red terra sigillata also changes colour as well as gloss as the temperature is increased. Starting with orange red then brick red, it will finally turn red-brown before fusing due to the high iron and flux content.

Other clays like stoneware, ball clay and china clays will give white to a light tan depending on their source and chemistry.

Colouring of the Terra Sigilatta

Fine oxides or finely ground ceramic stains can be mixed with the slip to create a wider range of fired colours. However in general the greater the addition of stain the lower will be the gloss on the finished product. Best practice requires the stains to be thoroughly dispersed using a ball mill process. However very finely divided oxides like copper carbonate or cobalt carbonate can be added in small quantities without significant loss of shine.

Summary

Clearly the making of Terra Sigilatta is a skilful but labour intensive process. The decanting process is critical to obtaining the highly decorative glossy finish. However the quality of finish with the soft buttery feel is worth the effort. Indeed many alternative effects have been  obtained using the sigilatta slip in underglaze or combination with other potting methods. It still amazes how the ancient potters developed such sophisticated pottery effects over 2000 years ago. Modern pottery continues to learn from the past by application of our  greater scientific understanding! Long may it continue!

More information and other technical articles on pottery and ceramics can be found at my website The Potters Friend. Go now to sign up for my free newsletter.