 Whilst second hand wheels exist it is difficult to judge their state of repair and future reliability. Therefore make sure you make an informed choice. So what factors should you consider when buying your pottery wheel? Weight of clayWhen choosing a pottery wheel the weight of clay you intend to throw decides the power of the motor you will need for a power driven wheel. Typical weights are as follows:
Quality and ease of operationQuality of wheel can be an issue as it comes at a price. However you should also consider at least:
MobilitySome wheels are very light in weight and designed to be portable whilst others are meant to be static. Consider if you want to move the wheel between different locations. Heavy powerful wheels can be more durable and long lasting. Examples of different wheel types are: A Tabletop Wheel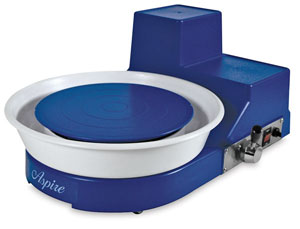 The Shimpo Aspire can handle your most creative challenges. Its lightweight, compact design makes it easy to transport, and a 20 lb centering capacity makes it a practical addition to any studio or classroom. The Aspire features a 1/3 HP, 100W DC motor, a 7" alloy wheel head, and a removable one-piece splash pan. The wheels speed ranges from 0–230 rpm, controlled by a hand lever. Also included are two 9¾" bats. It measures 9" H × 14½" W × 20" L and weighs 25 lb . Amazing, affordable, accommodating … Aspire! Shimpo’s Aspire Pottery Wheel includes a two-year limited manufacturer’s warranty. A Powerful model suitable for seated use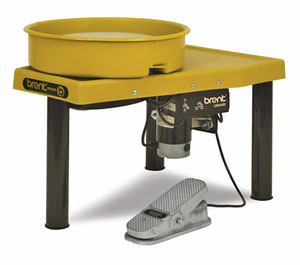 Super quiet model for seated use-The Shimpo's Whisper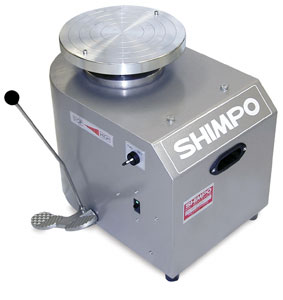 |
Warranty and CostWarranty and cost often go hand in hand. A warranty can be anything between 1 and 10 years and cost will be upward of $350 dollars for a new wheel. It is worth asking if it can be repaired locally within the warranty if anything goes wrong.. |

Showing posts with label pottery wheel. Show all posts
Showing posts with label pottery wheel. Show all posts
Monday, 29 April 2013
How to Choose a Pottery Wheel


Tuesday, 30 October 2012
Burnishing unfired clay pottery
 |
| Burnished ware by David Greenbaum |
It reminded me that you never stop learning with pottery. It is such a wide subject which continues to grow as new techniques are invented (or old ones re-invented!).
History of clay burnishing
Many ancient potters used burnishing to make their pottery harder and more waterproof before they discovered the use of glazes. Nowadays, modern potters choose to finish their work by burnishing because of the subtle, but beautiful finish achieved using this method. A burnished pot often has a soft, tactile quality all its own. However modern potters also need to know that this type of pottery should be used for decorative purposes only and not for ware intended for contact with food or drink.
Health and safety considerations are now a more important part of our modern life!
So What is Burnishing and how is it done?

Working in very small areas, applying a little lubricant at a time to the piece, rubbing in different directions will gradually create a sheen. Care is needed as sufficient force is needed to compress the surface but not create a hole or flake. After firing the sheen is mostly retained and can be improved by polishing with beeswax or other types of wax.
Some key factors to consider when using this technique include:-
Choose your clay wisely
Burnishing requires either a very fine clay body, or fine clay engobe. Clay bodies which contains grog or sand are therefore not recommended for this technique. Low firing clay bodies such as earthenware are also recommended as higher firing bodies can give rough texture after firing.
Choose your shapes wisely
Pots with smooth flowing surfaces are easier to burnish and look so much better when fired. Complex shapes with sharp corners or surface features will be almost impossible to burnish properly.
Choose your tools wisely

Choose your burnishing oil wisely.
To aid the burnishing process the use of a burnishing lubricant is recommended. The lubricant allows the clay to densify and give an even smoother finish after firing. . Lubricants that are often used include vegetable oils, lard, and water. Although the choice of lubricant is subjective, water is the least recommended as there is a tendency for it to soak into the body or flake the surface as it is pressed.
Firing
Firing of the ware after burnishing is important and can alter the texture of the surface significantly. Low firing clay bodies appear to work best.
Post firing polishing
Firing gives the burnished ware a lovely, tactile soft feel. In ancient times, animal fat, oil, and wax were often used to make it more waterproof and to restore the pre-firing high gloss. Today, most potters use a form of wax. Paraffin wax, candle wax, and beeswax, have all been used successfully. By applying the wax to a small area of heated ware and polishing a high sheen can be achieved. The result is an outstanding piece of decorative ware that often looks as though it has been glazed but feels so different!
If you found this article of interest make sure you read about Terra Sigallata a method for making shiny ware without the polishing stages!
Of course more information and other technical articles on pottery and ceramics can be found at my website The Potters Friend. Go now to sign up for my free newsletter.
Subscribe to:
Posts (Atom)